
At twic, I recently worked on improving front-end performance. This post is something I wrote for internal documentation. Resharing it here with permission.
Here are a couple of easy methods to improve performance without writing much code.
1. Image Optimization
Images are one of the important parts of the front-end. They might be the heaviest part of the overall page size as well. So having them optimized is the easiest way to improve performance.
For this, I am using Cloudinary, a paid service. The advantage of using this service is that, you don't even have to upload all your images to their server - making the migration easier. You can keep on referring images to your server and clodinary will, on run time manipulate the images and serve you back, in a new URL.
As this post is about making visible performance improvements in a short period of time, Cloudinary is a great option. If this was for my personal use, I would have used any free and open source alternative - or built my own build system which helps me generate optimized image without relying on a proprietary tool.
- Use WebP
WebP is a new image format specifically designed for web. On supported browsers we should auto load webp format.
Impact: Reduced file size, faster image load.
With cloudinary, you can do this via setting fetchFormat as auto in the request. This will, based on your visitor's browser, auto load webp.
import cloudinary from 'cloudinary-core';

const cl = new cloudinary.Cloudinary({});

export const getImageURL = (url) => {
  const opt = {
  	type: 'fetch',
  	fetchFormat: 'auto'
  };

  return cl.url(url, opt);
};

getImageURL('https://example.com/image-url.jpg');- Use actual sizes of the display area
Go through your code base where you use images and set the width and height of the image to match the bounding box. For example, if you are showing images in a 100x100 px try to send the them from backend in this size.
Impact: Reduced file size, faster image load, better rendering performance
import merge from 'lodash/merge';

export const getImageURL = (url, options) => {
  const opt = merge(
    {
      type: 'fetch',
      fetchFormat: 'auto'
    },
    options
  );

  return cl.url(url, opt);
};

getImageURL('https://example.com/image-url.jpg', { width: 100, height: 100});- Support HiDPI
HiDPI displays are common nowadays. We need to load images twice the size of the bounding box to get matching quality for a pixel ratio 2 device, otherwise images may look pixelated.
Impact: Visually better
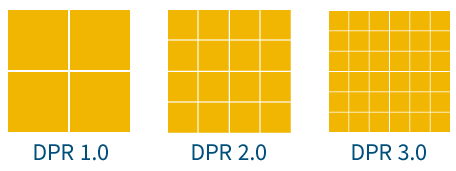
Pixel ratio of the device can be taken via window.devicePixelRatio.
export const getImageURL = (url, options) => {
  const opt = merge(
    {
      type: 'fetch',
      fetchFormat: 'auto',
      dpr: window.devicePixelRatio
    },
    options
  );

  return cl.url(url, opt);
};

getImageURL('https://example.com/image-url.jpg', { width: 100, height: 100});- Better Profile Pics
When you use a user-uploaded avatar in different parts of the project, they may not look good in different sizes of your requirement.
Face detection option of cloudinary to generate better looking avatars can be used to generate better pictures.
Impact: Visually better

export const getAvatarURL = (url, options) => {
  const opt = merge(
    {
      type: 'fetch',
      fetchFormat: 'auto',
      crop: 'fill',
      gravity: 'face'
    },
    options
  );

  return cl.url(url, opt);
};


getImageURL('https://example.com/avatar.jpg', { width: 100, height: 100});
2. Code Split
Code splitting allows you to create multiple chunks of the final generated JS file, which will be optimized for faster page loads. For example, if I am in home page, it is unnecessary to load all the js files and module dependencies of a profile page or any other inner page.
Impact: Reduced file size (page wise), faster page load, reduced cache miss
If you are writing a modern front-end project, most likely that you are using Webpack. If it is react, more likely that you are using Create React App(CRA) as well. The good news is that CRA, already supports code splitting. We just need to specify your routers in a supported format.
There are different ways to specify this. Initially we had to use third party libraries for it, but recently React added built in support with Lazy-Suspense.
In your router config, import each page in following way
const MyPage = lazy(
  () => import( /* webpackChunkName: ThisIsGoingToBeTheFileNameGenerated" */
  './pages/myPage') );
For reduced chunk size, import individual files/functions rather than the entire library.
// Bad
import lodash from 'lodash';

// Good
import forEach from 'loadsh/forEach';
(NB: Ideally, a better tree shaking algorithm may auto detect and handle this case, but it is a better idea to have this)
3. Static File Caching
In order to cache static files, we need to set necessary http header. Static caching is more important when you have JS code split into multiple chunks. If you have made a change in profile page, your home page JS will continue to load from cached copy, only when a user tries to visit profile page, it will fetch a new file.
Impact: faster page load on revisits
Set http cache duration to at least 30 days. Exact value can be decided based on the duration in which you deploy your project.
If you are using google cloud, then set expiration: "30d" in your app.yaml file.
